


This game is a playtest of Colonial Back of Beyond miniatures rules developed by the Gourmet Wargaming Club (GWC) based in Northern California. We used Zoom to connect players across the world, from California, to Texas, New Jersey, and New Zealand.
The French are establishing a lakeside trading post at the place the Natives call Ohneka, the Waters. The Abenaki are building a village there as well. On a clear Spring day, the work moves ahead. A resupply and relief column is arriving with reinforcements. The walls of the trading post are up, more forest is being cleared, new fields are being fenced, and the hunting parties are bringing in game. Suddenly a scouting party of Colonial Marines emerges in haste from the forest to report contact with a British raiding party moving through the woods. The action begins.
GAGNON (senior French commander)
Brigade FORTIN
Lapointe - Colonial Marines (Veterans) - 7 figures
Damers - Villagers (Levy) - 10 figures
Awasos - Abenaki warriors (Veterans) - 7 figures

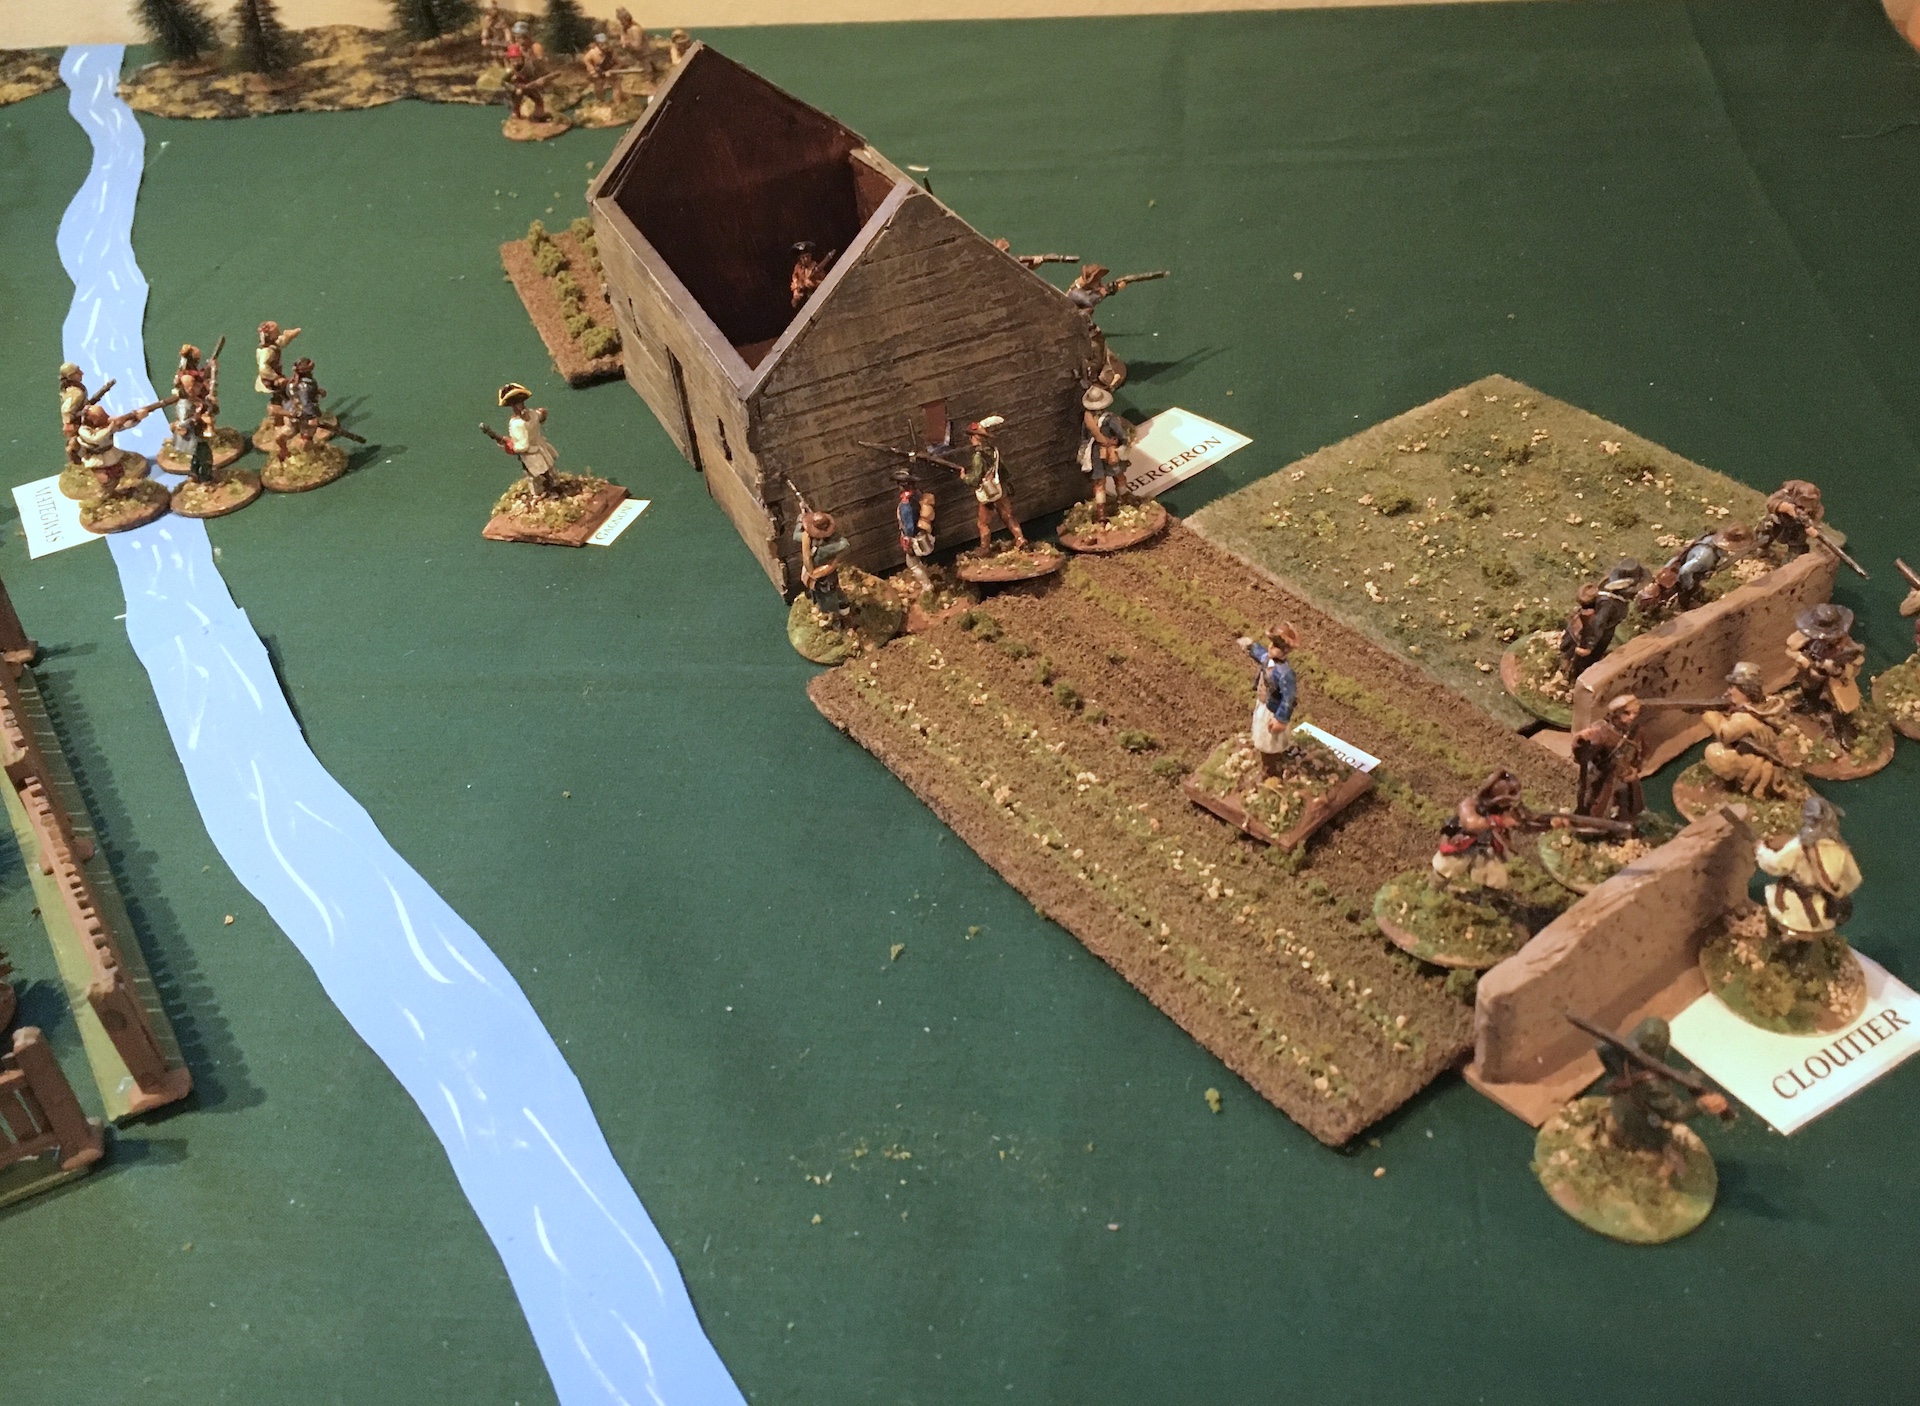
Looking north over our gaming table as the battle begins. The main terrain features (from west to east, or left to right) are dense forest, a logged area, a cluster of wigwams, an enclosed plowed field, an enclosed orchard, small stream, trading post, and the lake itself. The British and their Iroquois Indian allies will enter through three trails in the woods.

Abenaki warriors of Brigade Fortin are busy erecting wigwams.
Troops of Brigade Fournier are building the trading post and field fencing.

The French resupply column arrives under the protection of Brigade Girard.

Colonial Marines of Brigade Fortin arrive with news of the imminent British arrival.

The alarm is raised: "The British are coming!" Brigade Girard's Ligne Fusiliers and Abenaki march into the fenced field (top) as the Abenaki of Brigade Fortin rush southward from the wigwams to the dense forest surrounding the south trail. Supply wagons trundle towards the trading post, where Brigade Fournier is scrambling to move north. At the top of the photo the French "Coureur de bois" Rangers march towards the north forest trail.

In the west, French Colonial Marines advance into the forest to fire into Iroquois advancing at the point of Brigade Padgett.


Nadeau's Rangers bravely position themselves to block the advance of Brigade Saunders. Naturally, the Iroquois take this as a challenge, and charge into close combat.

The coureur de bois were wiped out to the man, but slowed the Iroquois advance (top). Would the Ligne Fusiliers and Abenaki in the fenced field engage?

In the south, Awasos's Abenaki met Roger's Rangers (under Taylour) as Brigade Canady moved up the southern forest trail. The Abenaki were pushed back with losses on both sides.

Back in the north, the Mategwas's Abenaki charge the Iroquois. Note Geare's Volunteer Militia watching the resulting close combat. The Abenaki were sent packing, with more losses to both sides. Note that the plastic ring markers on the figures denote units in "open order" rather than formed up in formal 18th-Century military style.

At top left, Damer's Villager Levies fall back within shouting distance of Dawling's Provincials. The white casualty caps mark increasing levels of fatigue; the French have been hit hard by advancing units of Brigade Padgett.

Indeed, Ackroyd's Fusiliers (with Padgett himself attached) follow Damers, and come crashing down on the hapless French villagers.

Back in the north, Geare's Volunteer Militia rush the fenced field, but are answered by a counter-charge from Bouchard's Ligne Fusiliers. The militia quickly fall back to the forest.

Note Mikonse's Iroquois warriors (top left) attempting to skirt the units of Brigade Girard to attack southward to get the trading post. Bergeron's villager levies (foreground) have fallen back from the edge of the fenced field, finding themselves in position to be a useful speed bump.

Tioicha's Iroquois warriors (from Brigade Canady) have arrived on the edge of the lake by canoe to try to take the French from behind. Ahead of them is the fenced orchard (top), now filled with numerous French militia and some wounded Abenaki. This won't be a cakewalk.

As the game comes to an end, Dawling's Provincials (with Canady himself attached) march towards the south of the trading post. Note Roger's Rangers hiding in the forest after taking a pasting from the French defenders.

In the west, Brigade Padgett remains entangled with the scattered remnants of Brigade Fortin.
After a day of furious and chaotic fighting, the British raiders were stymied by a vigorous French defense of their new trading post. Victory for France!
Many thanks to G.C. for devising and hosting this very enjoyable scenario, and also for supplying all the photos of the action. "You've got good toys!"
Here's a battle we fought in the lounge of Chateau Examiner on Sunday 9 August, on a winter's day in Nelson, New Zealand. We used 15mm (1/100 scale) miniatures with a homegrown rule set called Hail of Lead.
This scenario is historical, and is based on portions of Scenario 28: Hell is Cold! published by GHQ Models in their Tac News magazine from 2006. You'll find it on their website.
Two Kampfgruppen from 1st SS-Panzer Division are slogging through snow and mud to try to relieve a pocket of German troops trapped in the Korsun area. In their path are elements of 20th Tank Corps: 80th and 155th Tank Brigades, plus 7th Guards Motor Rifle Brigade. The Germans have an edge in quality and armour, but there are masses of Soviets to contend with.
Historically the Germans bogged down due to heavy ground conditions and tenacious Soviet resistance. But what if a cold snap had firmed up the boggy ground and snow cover was light? This is the setting for our "what-if" refight of the battle for the Korsun-Cherkassy Pocket.

In this photo we look over the battlefield towards the southeast before any troops are deployed. Victory will be determined by accruing victory points (VP) for each objective captured and held. Each key location on the table has a particular VP value.
To the left (at the Soviet table edge) we see the town of Potshapinzy (3 VP); closest to the camera is the town of Dshursheny (1 VP); Hill 239 (3VP) dominates the centre; the smaller pancake beyond it is Hill 180 (1 VP); at top right is the farming village of Oktyabr (2 VP); and the German entry point (2 VP) is the tip of a balka (aka ravine) on the right edge of the table.
9 or more VP = major victory; 7 or 8 = clear victory; 6 = a draw; 4 or 5 = minor loss; 3 or less = major loss. Both sides begin the game with 4 VP each.
Most terrain is open, and does not hinder movement or line of sight (LOS). Lines of small stones represent rises, which block LOS. The big patch of woods to the south of Hill 239 is difficult going, and LOS is limited to 5cm within it. Balkas are shown as streams surrounded by bush; they are actually depressions below the level of the battlefield, and thus LOS is unblocked across them. Village blocks provide hard cover to units occupying them.

We kick things off by having both sides deploy their units on the table according to scenario instructions. Units are hidden until spotted by the enemy. Hidden units are shown as trays (rectangles of felt) marked with numbers that correspond with the roster for each side.

Above are the Soviet forces in all their glory. From left to right: 155th Tank Brigade (deployed in Dshurshenzy); 80th Tank Brigade (in Potshapinzy); and 7th Guards Motor Rifle Brigade (deployed south of Hill 239). I'd call that a Rumpus of Reds!
Most miniatures are by Battlefront (i.e., Flames of War) but the trucks are Zvezda plastics.

Und the Germans. On the left is Kampfgruppe Dekker, featuring elements of SS-Panzergrenadier Regiment 1; at right is Kampfgruppe Bäke, including elements of SS-Reconnaissance Battalion 1. It's a veritable Festival of Fascists!
Most miniatures are Battlefront, but the Tigers, StuG's, and eight-wheeled armoured cars are Plastic Soldier Company.

Beverages have been chosen. You can see the Soviet unit trays splayed out in front of Potshapinzy. They are already on the move towards Hill 239.

The German commander moves elements of Kampfgruppe Dekker into the woods to suss out the enemy.

Such a civilised setting for a very uncivil war. Next time I'll break out a bottle of bubbly.

The battle begins in earnest: we finally have miniatures on the table as units are spotted. Soviet 155th Tank Brigade in and around Dshurshenzy have met Tiger tanks of Kampfgruppe Bäke. The artillery battalion (with 76mm "crash-boom" field guns) in the foreground sent one Tiger platoon packing, but the two battalions of T-34 M1943 tanks just bounced shot off the heavy brutes.

The Soviet opt to rush the German at their entry point, sending a company of SMG tank riders in to attempt to assault the remaining Tiger. The red balls denote losses within a unit; for example, the closest company of T-34's has lost two tanks to 88mm armour-piercing shells from the big cats.

Hidden Soviet units of 80th Tank Brigade move up to Hill 239 from Potshapinzy. Each unit tray has a command die to show the responsiveness (movement rate) of the unit.

The Soviet rush against the Tiger has been quashed by a hail of fire from various armoured elements of Kampfgruppe Bäke emerging from the balka. In a moment the SMG teams will receive a blast of quad 2cm autocannon fire from a Wirbelwind AA tank that will wipe them out.

The Germans are not without their own artillery support: the Soviet artillery outside Dshurshenzy is barraged by 15cm shells from two batteries of Hummel self-propelled howitzers off-table. The barrage markers are fashioned from pieces of packing foam from blister packs that are hot-glued to mudguard washers (aka fender washers) and spray-painted black.

The two sides are gingerly moving towards each other in the big patch of woods.

Troops of Kampfgruppe Dekker are revealed as they move forward to engage. We see two dismounted companies of Panzergrenadiers, plus an amoured engineer company with half-tracks at top.

Panthers of Kampfgruppe Bäke enter from the balka.

The headquarters company of Dekker moves up the road towards the summit of Hill 239, as do two companies of StuG III G's from Bäke.

Soviet 80th Tank Brigade pushes their mobile artillery (SU-76 self-propelled guns) and tank killers (SU-85 assault guns) forward to engage the enemy armour.

The dismounted motorised infantry of 155th Tank Brigade hold Dshursheny as the Germans begin their counter-attack.

The entirety of Kampfgruppe Bäke can be seen in this photo. In the foreground is an understrength company of Panzergrenadiers in half-tracks. Yellow balls mark teams that are suppressed; Soviet anti-tank rifles have laid down withering fire from the town.

Soviet commanders try to look nonchalant as they throw every scrap of armour at the German juggernaut.

German commanders are appreciative of the tenacity of the enemy, and are desperately curious to know exactly what sort of enemy force is in that big patch of woods.

The referee takes a much-needed selfie break... Don't let the modern Russian shoulder boards fool you, this dude is strictly non-partisan. (He accepts both Soviet rubles and Reichsmarks.)

The Germans assault Dshursheny with elements of Bäke supported by fire from the off-table Hummels.

Panthers drive around the back of Hill 239 as the StuG's on the summit are hit by Soviet artillery.

The SU-85's supporting 80th Tank Brigade fell quickly to the 88mm guns of the Tigers. Brigade headquarters and the SU-76's are cowering at the base of Hill 239.

80th Tank Brigade's artillery at Potshapinzy hammer the hilltop in front of them.

And yet more Soviet artillery: this is the mortar battalion (with 82mm and 120mm weapons) on top of Hill 180, firing in support of the 7th Guards Motor Rifle Brigade.

A German anti-aircraft company advanced from Oktyabr to protect the flank of Dekker, but came to grief in a barrage from the mortar battalion in the previous photo.

A bird's eye view of the battlefield as our day of fighting was rapidly drawing to a close.

The Soviet defenders at Dshursheny have been thrashed, but it took valuable time and effort to deal with them.

The "rumble in the jungle" ends with Dekker's troops being ambushed by superior numbers. This action effectively ended the battle, as both sides were running low on troops and time. The Germans managed to capture Hill 239 to add to their VP. In time they might have made further progress, but we ended the game with a draw. Well done both sides! (Your referee thanks you for your respective donations.)

Clear-up time. "Hey, look happy!"

"Okay, put on your sad faces!" Those shirts are hiding a myriad of small bruises and tiny bullet holes...